


Satisfactory Viewer
Satisfactory is a game that I have enjoyed playing recently after being introduced to it by my cousin.
It is a mostly first person factory building simulator - a 3D Factorio if you will.
You play by exploiting resource nodes - iron ore, copper ore, limestone, etc, and build machines to convert them into the various parts like iron plates, screws, wire, and concrete which are needed to progress the game and expand your infrastructure. As the game progresses, more resources can be exploited and more and more complex parts can be built from them.
The game can be played solo or cooperatively with others - others can join your game while you're playing. The developers recently released dedicated servers so I set one up so my cousin could play on our shared world even if I was unable to at the time he wanted to play.
Dedicated Server
The server can be run on Windows or Linux, but before I had to look at how to run it, I came across the wolveix/satisfactory-server docker container which did it all for me. As my home server setup already supports running docker containers, it was pretty easy to set up a new LXD container to run it in with a volume to store the satisfactory data and saves in.
tasks/main.yml- name: start the server
docker_container:
name: satisfactory
image: wolveix/satisfactory-server:latest
pull: true
restart_policy: always
volumes:
- "{{ satisfactory_data_dir }}:/config"
env:
MAXPLAYERS: "4"
PGID: "500"
PUID: "1001"
STEAMBETA: "false"
published_ports:
- "7777:7777/udp"
- "15000:15000/udp"
- "15777:15777/udp"The volume is used to store game data required by the server. It is a volume so that the significant amount of data needed (about 4.5GB) doesn't need to be downloaded each time the container is started. The volume also contains the save files made by the game.
Viewer
As time progressed, I wished for a way to see what progress had been made in our world without having to load the game. Luckily, there is an interactive map as part of the Satisfactory Calculator, and even better it's possible to load save files to view current progress. Best of all, is that it can load saves from URLs.
So all that would be required was a script to read the save filenames, perhaps order them by date and generate links to the Satisfactory Calculator with reference to a URL that the save file can be downloaded from.
I wrote a quick proof of concept in PHP, but decided it was a nice little project to learn Golang with. This seemed ideal as all of the logic had already been determined. It would also simplify the deployment process - being able to distribute a single binary and execute it.
I'm certainly no designer, but to be fair to the design of this project I just threw something together quickly. Be thankful it's not just text links...
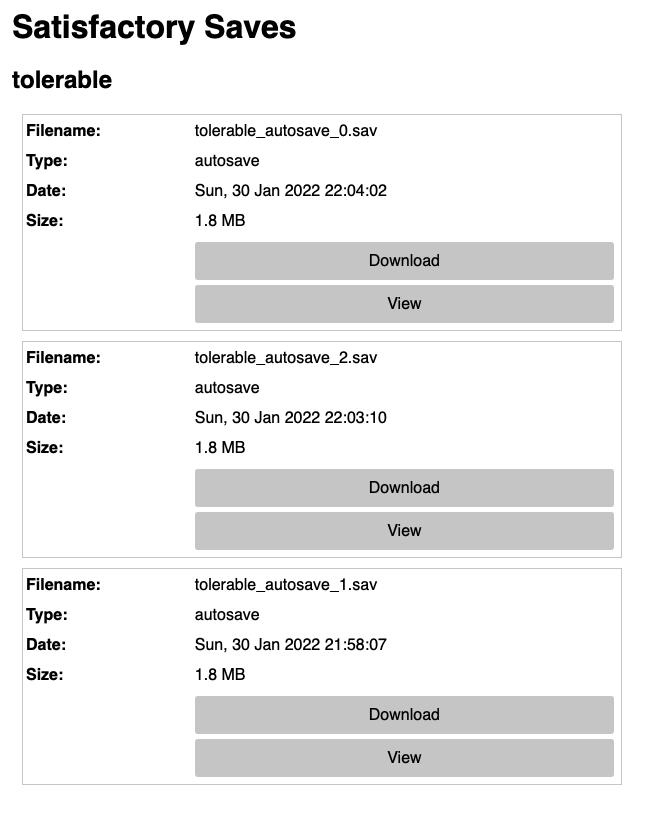
Clicking on the "View" button loads the interactive map in Satisfactory Calculator.

A couple of CSP headers are required for the Satisfactory Calculator to fetch the save files. I probably should have had this program serve them with the files, but I took the easy route out and made Nginx serve them instead:
nginxadd_header Access-Control-Allow-Headers "Access-Control-Allow-Origin";
add_header Access-Control-Allow-Origin "https://satisfactory-calculator.com";Learning Golang
I have some basic experience with writing little go scripts for monitoring checks and metrics gathering for Sensu Go, so I'm already reasonably comfortable with using the language. However, I'm sure while picking it up (especially for this project) I'll have committed some Golang faux pas. This isn't meant to be a tutorial for how to be a great Go programmer.
I thought I'd highlight some interesting things I learned on my journey.
The whole project is published on Github - https://github.com/JonEllis/satisfactory-viewer - in case there are mistakes in my simplifying of these features for this post.
HTTP Server
Listening for HTTP requests is really easy using the net/http module.
// When a request starting with `/` arrives, handle it with the `index` function.
http.HandleFunc("/", index)

// said index function
func index(w http.ResponseWriter, req *http.Request) {
	fmt.Fprintln(w, "The response body")
}

// listen on port 1234 for HTTP requests
http.ListenAndServe(":1234", nil)
It is also very easy to serve files from the Satisfactory save directory.
Like with http.HandleFunc, there is a http.FileServer which takes a path to serve.
http.HandleFunc("/", index)

fileServer := http.FileServer(http.Dir(savePath))
http.Handle("/path/", http.StripPrefix("/path", fileServer))

http.ListenAndServe(":1234", nil)
Going back to the HTML listing page, for more complex html documents, templates can be utilised using html/template.
type MyPageData struct {
    Some string
    Data string
}

func index(w http.ResponseWriter, req *http.Request) {
	tmpl := template.Must(template.ParseFiles("template.html"))

  data := MyPageData{
    Some: "This is my value",
    Data: "Yet another value"
  }

  tmpl.Execute(w, data)
}
Then the template can be processed and variables injected.
template.html<html>
<head>
<title>An Example</title>
</head>
<body>
<dl>
<dt>Some</dt>
<dd>{{ .Some }}</dd>
<dt>Data</dt>
<dd>{{ .Data }}</dd>
</dl>
</body>
</html>Embed Files
A caveat is that the template file needs to be available relative to the built executable. Luckily, since Golang 1.16, it is possible to embed files into the go program. This allows the template to be used without having to distribute it with the binary.
embedvar templates embed.FS
type MyPageData struct {
Some string
Data string
}
func index(w http.ResponseWriter, req *http.Request) {
templ, err := template.ParseFS(templates, pages["list"])
if err != nil {
// Something went wrong loading the template
return
}
data := MyPageData{
Some: "This is my value",
Data: "Yet another value"
}
tmpl.Execute(w, data)
}Github Actions
To make this app easier to deploy from my Ansible scripts, it would be useful if it could be built for me and easily accessible. Of course I could build it locally and reference or copy it to my Ansible repository, or even build it privately with my Gitea/Drone setup (which is used to build and deploy this website) and serve the binaries from somewhere.
I decided to make this project public on Github, so I thought I'd give Github Actions a try seeing as my use case was likely common and straight forward. I have been lazy and just built it for x86 linux which is my current use-case.
For any new tag that starts with v, the it checks out the repository at that tag, builds the project, creates a new
release, and uploads the built binary to the release.
name: Satisfactory Viewer

# Only run when a tag is pushed
on:
  push:
    tags:
      - v*

jobs:
  build:
    runs-on: ubuntu-latest
    steps:
      # Checkout the project (at the tag)
      - name: Checkout
        uses: actions/checkout@v2

      # Setup the right version of Go
      - name: Setup Go
        uses: actions/setup-go@v2
        with:
          go-version: 1.17.6

      # Run the make file to build the binary
      - name: Build
        run: make build

      # Create a new release
      - name: Create Release
        # This ID is specified to reference this step later
        id: create_release
        uses: actions/create-release@v1
        env:
          # This token is passed in by Github automatically
          # no token generation is necessary
          GITHUB_TOKEN: ${{ secrets.GITHUB_TOKEN }}
        with:
          # Both variables are passed in by Github
          tag_name: ${{ github.ref }}
          release_name: Release ${{ github.ref }}

      # Upload the binary to the newly created release
      - name: Upload Binary
        uses: actions/upload-release-asset@v1
        env:
          # This token is passed in by Github automatically
          # no token generation is necessary
          GITHUB_TOKEN: ${{ secrets.GITHUB_TOKEN }}
        with:
          # This references the previous step by ID
          upload_url: ${{ steps.create_release.outputs.upload_url }}
          # The built binary
          asset_path: ./bin/satisfactory-viewer
          # What we want it to be named in the release
          asset_name: satisfactory-viewer
          asset_content_type: application/octet-stream
When this runs, a new release is created from the tag, and contains a link to download the asset.
I can then use my github_release_download Ansible module, that I'm yet to release publicly (sorry Bas) to download
the latest release from Github when I run my Satisfactory role.
Versioning
In the past I have found it useful to be able to get the version of something out easily, so I wanted to add this feature to this program.
Apparently there is a new way to do this coming in a future version of Go, but for now this is done using ldflags.
At build time, I can get the current tag (without the leading v) out of git using this shell command:
git describe --tags --always | sed 's/-/+/' | sed 's/^v//'Then this can be passed into go build using this:
shellgo build -ldflags "-X main.version=$(VERSION)" [more arguments]This can be made accessible in go by defining the string variable version in the main package.
Then it can be used like any other variable.
var (
  version string
)
This all comes together in the Makefile:
MakefileVERSION := $(shell git describe --tags --always | sed 's/-/+/' | sed 's/^v//')
BUILDOPT := -ldflags "-s -w -X main.version=$(VERSION)"
SOURCES := $(wildcard *.go)
build: fmt $(SOURCES) clean
@$(foreach FILE, $(SOURCES), echo $(FILE); go build $(BUILDOPT) -o bin/`basename $(FILE) .go` $(FILE);)
fmt:
@$(foreach FILE, $(SOURCES), go fmt $(FILE);)
clean:
rm -f bin/*